When I first started my web design business, my client onboarding process was nonexistent.
Every time a new client inquired about working with me, it felt like I was flying by the seat of my pants. I was winging it! Someone would inquire, and I’d just do what I thought was the next right step. And that was ok for the first few months.
But then, my lack of systems and processes started to catch up with me. Instead of celebrating when a potential new client entered my pipeline, I became stressed and overwhelmed.
That’s when I knew something had to change.
So, I took the time to assemble all the aspects of onboarding my previous clients seemed to love. Now, when new people inquire, I have an established, tried-and-true client onboarding process that has an almost 100 percent success rate in getting people to book.
This process has completely transformed my business and has eliminated so much stress and overwhelm! And today, I’m sharing it with you so you can experience more peace as you bring on new clients.
Whether you’re a life coach, accountant, or photographer, this onboarding process will organize your service-based business and have you feeling like the professional you are.
Disclaimer: We are proud affiliates for some of the products mentioned in this post. If you make a purchase after clicking on these links, we’ll receive a commission at no extra cost to you. We only recommend tools we’ve tried, tested, and loved.
Book More Clients With This Super Streamlined Client Onboarding Process
Anyone can use this client onboarding process, but it will be easiest to implement if you have a CRM, or Client Relationship Management software, to help you.
A good CRM is the backbone of any successful service-based business. The software I use is called HoneyBook. It puts my client workflow on autopilot, saving me a ton of time and organizing the details of every client project. (You can get 50% off your first year of HoneyBook using my referral link!)
Of course, you can build this same workflow in any CRM or project management software you choose. But I can’t recommend HoneyBook enough!
I’ll walk you through each step of the process and explain what technical tools you’ll need to implement it.
Step 1: A potential client inquires
Your client’s journey begins with a way to contact you. What options do you give people to express their interest in working with you?
Perhaps, at this point, clients have been booking you by emailing you, DMing you on Instagram, or getting in touch with you directly in some other way.
If you’re not already using one, it’s time to upgrade to a contact form on your website. This entry point sets up the rest of your client workflow for success. Instead of sifting through your cluttered inbox or list of DMs, you’ll be able to track all your client inquiries in one place.
Most website contact forms simply send you an email whenever a person submits an inquiry. This isn’t much better than having potential clients use your email address directly.
So, to get clients flowing directly into your pipeline, I’d recommend embedding a HoneyBook contact form directly onto the Contact page of your website.
This way, whenever new clients inquire, they’ll appear as new inquiries in your HoneyBook pipeline.

Another benefit to using this method is that you can set up an email autoresponder informing prospective clients that their inquiries have been received.
To do this, create a new email template in HoneyBook. I’ve created an email template and titled it, “New Application Autoresponder” in my account. This email thanks the person for inquiring and lets them know I’ll be in touch within two business days.
You can set this email to send automatically anytime someone submits through your contact form. To set this up, navigate to Automations in HoneyBook and create a new automation. Here’s what mine looks like:

This automated email provides reassurance to your clients, and it lets them know what to expect next from you. It’s a great way to make a wonderful first impression!
Step 2: Manually qualify the client
The next step in my client onboarding process is to manually review the responses that clients submit through my contact form.
I’ve designed my contact form in such a way that it pre-qualifies my clients before I ever get on a call with them. From their responses to my questions, I can tell if they have the type of business and budget that matches my services.
So, whether you’re using HoneyBook or not, ask for more than just a name, email address, and message from your prospective clients. Tailor your contact form to include questions that help you discern whether or not respondents are a good fit!
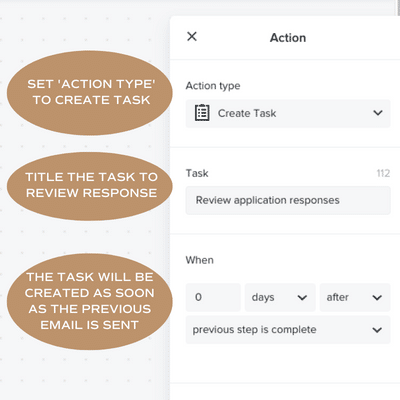
Going back to my HoneyBook automation, I’ve added a step after the autoresponder email goes out to create a new task. This task reminds me to review the applicant’s contact form responses after they’ve been submitted:
Step 3: Send a pricing guide & calendar link
After I’ve reviewed the potential client’s responses, I send her an email to share my Services and Pricing Guide along with my calendar link to book a free consultation with me.
And yep, you guessed it – I have all of this set up to send automatically.
After I check off the previous task of manually qualifying the client, HoneyBook proceeds with the onboarding automation and sends my pre-written email template. This email includes a link to my online Services and Pricing Guide which I created using HoneyBook’s Smart Files feature.
Calendar scheduling is also a feature that comes with HoneyBook, so I don’t have to use any external scheduling software.
By sending a Services and Pricing Guide, potential clients get to learn about my services and minimum price points before ever hopping on a call with me. This step is what makes my sales calls have an almost 100 percent success rate! People know exactly what to expect from me before ever seeing my face on their computer screen. There’s no blind-siding or sticker shock.
You’re probably familiar with that feeling when you walk into a restaurant, look at their menu, and decide you don’t want to eat there. You look for a way to casually back out without drawing too much attention to yourself, but let’s face it – it’s awkward!
Having a Services and Pricing Guide is the equivalent of a restaurant that posts its menu online. Patrons can decide whether they want to eat there ahead of time, thus avoiding the oh-so-uncomfortable slow steps back toward the entrance.
If people have an issue with your pricing or aren’t interested in the services you offer, you’ll find out about it at this step.
And here’s the kicker – because practically every step has been automated up until this point, you won’t have wasted any time trying to win a client that isn’t a good fit! If that’s not the definition of working smarter, not harder, then I don’t know what is.
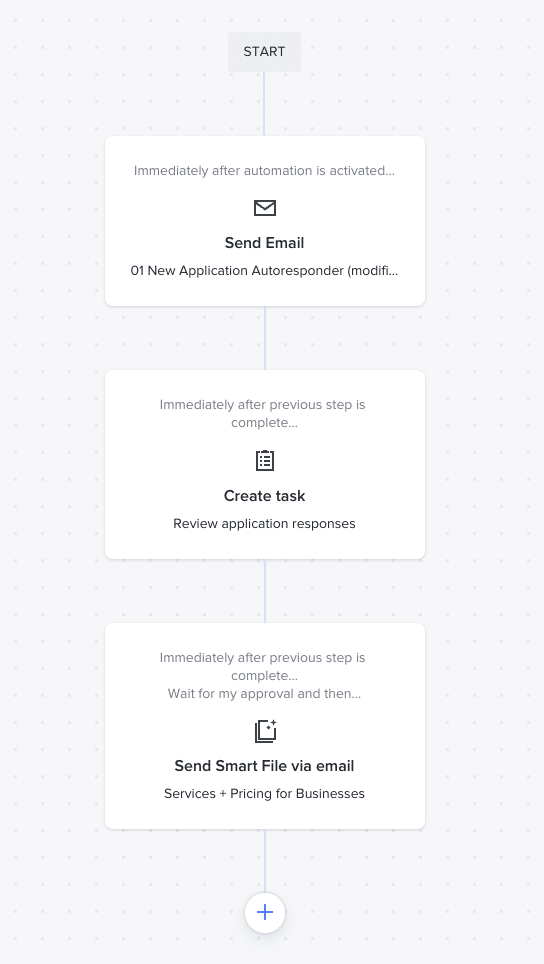
Here’s an overview of what the full automation looks like up to this point:
Step 4: Hold a kickoff call
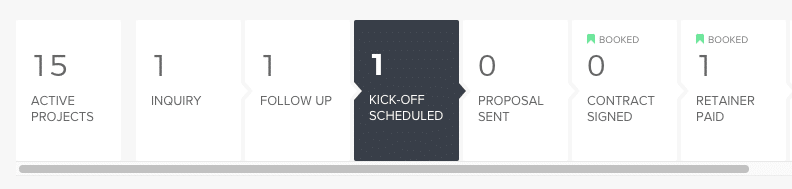
This is where the real work begins! At this point, you can be confident that your prospective client likes what they’ve seen and are interested in working with you. The client is moving through your pipeline without a hitch.
But it’s still up to you to help her find the right service package and seal the deal.
I prefer to conduct this step face-to-face over Zoom. The scheduling of this meeting is automatic – potential clients can pick a time on my calendar using HoneyBook’s scheduling feature.
And, since HoneyBook integrates with both Zoom and Google Calendar, I don’t have to spend any time going back and forth with clients or manually creating meeting links.
HoneyBook also sends automatic reminder emails to my client and me 30 minutes before our scheduled meeting to avoid no-shows.
Step 5: Send the client a customized proposal
*Sigh of relief* – the meeting’s over! Next, I send the client everything she needs to officially book her project.
Of course, HoneyBook makes this step incredibly easy as well! Having already created a proposal template as a Smart File, all I have to do is customize a few project details and send it off.
Here’s what I include in my proposal file:
- The client’s project goals
- Customized project timeline
- Communication expectations
- Contract for proposed services
- Payment schedule
- Initial deposit invoice
To make this step extra easy, I use an email template I’ve already pre-written to deliver the file to the client.
Step 6: Send a welcome email & welcome materials
Finally, after the client has signed the contract and paid the initial deposit, I send an email to welcome her as an official client!
In this email, I include any relevant welcome materials to complete the client onboarding process. Typically, this includes a questionnaire (also built in HoneyBook) and access to a secure client folder on Google Drive.
By the end of this workflow, your clients will feel downright special! They’ll know they’re in good hands because you’ve given them multiple touch points, and you haven’t left them for a moment to fend for themselves.
You’ve walked with them at every stage (even if a lot of the walking was automatic and you didn’t have to lift a finger!).
Try this client onboarding process out for yourself! And don’t forget to sign up for HoneyBook and get 50% off your first year using this referral link!